Active-Active HA for NGINX Plus on AWS Using AWS Network Load Balancer
This guide explains how to create our recommended solution for a highly available, active‑active deployment of NGINX Plus in the Amazon Web Services (AWS) cloud. The solution combines the AWS Network Load Balancer (NLB) for fast and efficient handling of Layer 4 traffic with NGINX Plus for advanced, Layer 7 features such as load balancing, caching, and content‑based routing. The combined solution is fast, powerful, reliable, highly portable to other platforms, and likely to be relatively low‑cost.
This guide explains how to set up an AWS NLB in front of one pair of NGINX Plus load balancers. (You can increase resiliency as needed by following the same steps for additional NGINX Plus instances.)
- About AWS NLB
- About NGINX Plus
- Solution Overview
- Prerequisites
- Configuring an AWS Network Load Balancer
The Appendix provides instructions for creating EC2 instances with the names used in this guide, and installing and configuring the NGINX software on them.
About AWS NLB
AWS NLB is optimized for fast, efficient load balancing at the connection level (Layer 4). AWS NLB uses a flow hash routing algorithm.
AWS NLB is ideal for fast load balancing of TCP traffic, as it’s able to handle millions of requests per second while maintaining ultra‑low latencies. This enables AWS NLB to more easily handle volatile traffic patterns – patterns with sudden and dramatic changes in the amount of traffic.
Unlike previous AWS solutions, AWS NLB supports both static IP addresses and Elastic IP addresses.
About NGINX Plus
NGINX Plus is complementary to NLB. Operating at Layer 7 (the application layer), it uses more advanced load‑balancing criteria, including schemes that rely on the content of requests and the results of NGINX Plus’ active health checks.
NGINX Plus is the commercially supported version of the NGINX Open Source software. NGINX Plus is a complete application delivery platform, extending the power of NGINX with a host of enterprise‑ready capabilities that enhance an AWS web application deployment and are instrumental to building web applications at scale.
NGINX Plus provides both reverse‑proxy features and load‑balancing features, including:
- Full‑featured HTTP, TCP, and UDP load balancing
- Intelligent session persistence
- High‑performance reverse proxy
- Caching and offload of dynamic and static content
- Adaptive streaming to deliver audio and video to any device
- Application-aware health checks and high availability
- Advanced activity monitoring available via a dashboard or API
- Management and real‑time configuration changes with DevOps‑friendly tools
Solution Overview
The setup in this guide combines AWS NLB, AWS target groups, Amazon Elastic Compute Cloud (EC2) instances running NGINX Plus, and EC2 instances running NGINX Open Source, which together provide a highly available, all‑active NGINX and NGINX Plus solution.
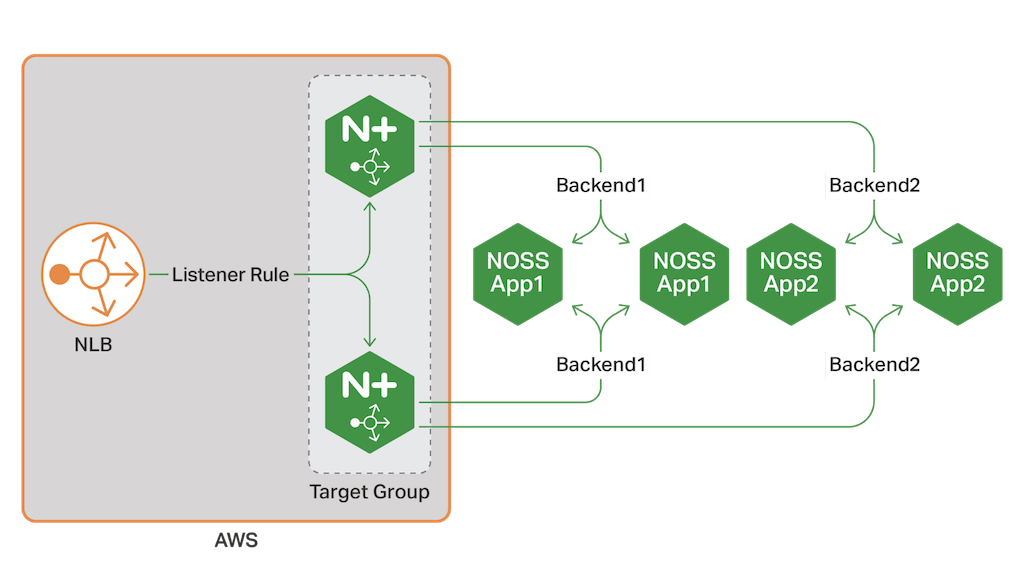
AWS NLB handles Layer 4 TCP connections and balances traffic using a flow hash routing algorithm. By default, an AWS NLB has a DNS name to which an IP address is assigned dynamically, but you can optionally attach an Elastic IP address to the AWS NLB to ensure that it will always be reachable at the same IP address.
The AWS NLB listens for incoming connections as defined by its listeners. Each listener forwards a new connection to one of the available instances in a target group, chosen using the flow hash routing algorithm.
In this guide, the target group consists of two NGINX Plus load balancer instances. However, you can register an unlimited number of instances in the target group, or use an AWS Auto Scaling group to dynamically adjust the number of NGINX Plus instances.
Prerequisites
These instructions assume you have the following:
- An AWS account.
- A subscription for each NGINX Plus instance, either paid or a 30‑day free trial.
- Familiarity with NGINX and NGINX Plus configuration syntax. Complete configuration snippets are provided, but not analyzed in detail.
- Six EC2 instances, four running NGINX Open Source and two running NGINX Plus. The Appendix provides instructions for creating instances with the expected names, and installing and configuring the NGINX software.
Configuring an AWS Network Load Balancer
With NGINX Open Source and NGINX Plus installed and configured on the EC2 instances (see the Appendix), we’re ready to configure an AWS NLB for a highly available, all‑active NGINX Plus setup.
- Allocating an Elastic IP Address
- Creating an AWS NLB
- Configuring the AWS NLB Routing Options
- Registering Instances in the Target Group
- Launching the AWS NLB
Allocating an Elastic IP Address
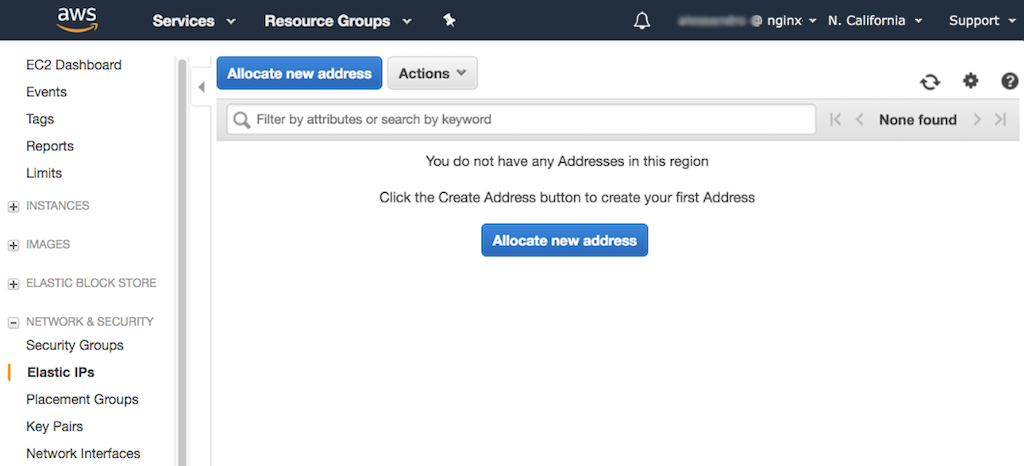
The first step is to allocate an Elastic IP address, which becomes the fixed IP address for your AWS NLB. (While using an Elastic IP address is optional, we strongly recommend that you do so. With a dynamic IP address, the AWS NLB might not remain reachable if you reconfigure or restart it.)
Log in to the AWS Management Console for EC2 (https://console.aws.amazon.com/ec2/).
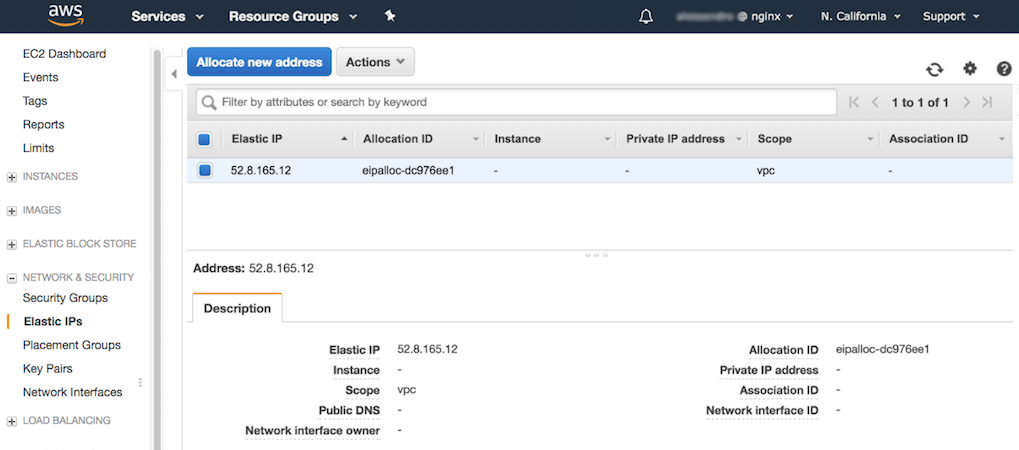
In the left navigation bar, select Elastic IPs, then click either of the Allocate new address buttons.
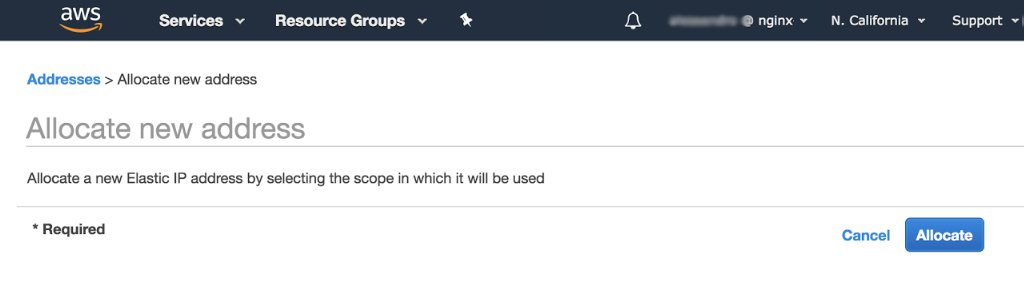
In the Allocate new address window that opens, click the Allocate button.
When the message appears indicating that the request for an Elastic IP address succeeded, click the Close button.
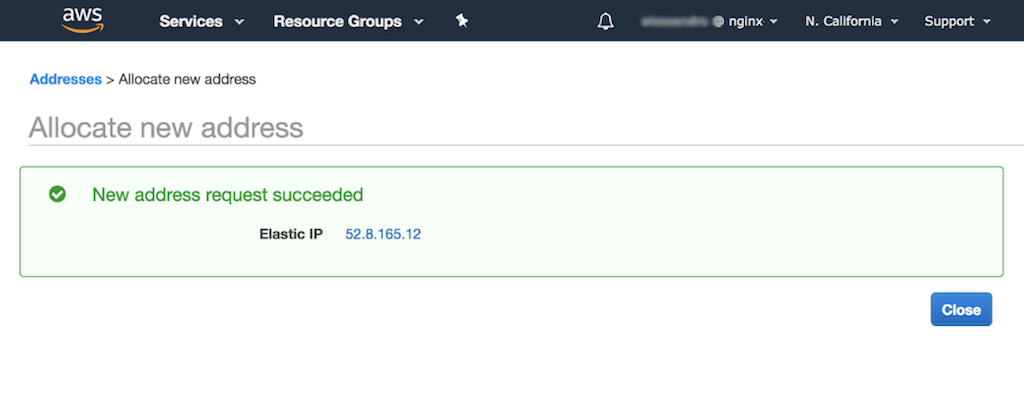
The new Elastic IP address appears on the Elastic IPs dashboard.
Creating the AWS NLB
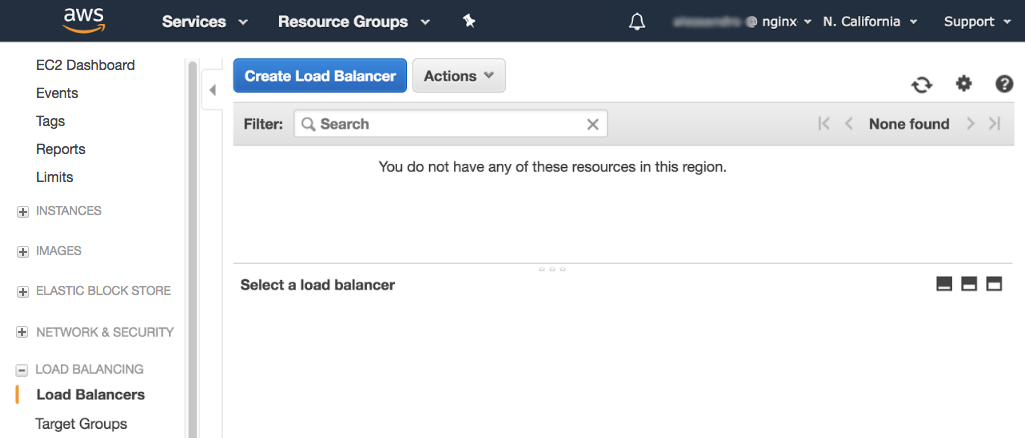
In the left navigation bar, select Load Balancers, then click the Create Load Balancer button.
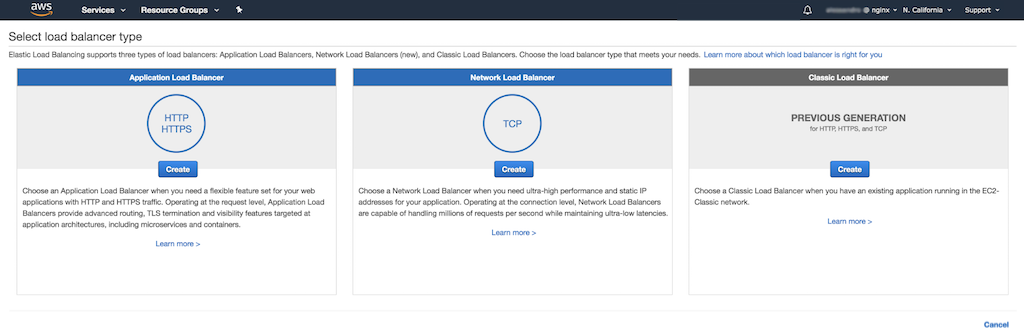
In the Select load balancer type window that opens, click the Create button in the Network Load Balancer panel (the center one).
In the Step 1: Configure Load Balancer window that opens, enter the following values:
- In the Basic Configuration section:
- Name – Name of your AWS NLB (aws-nlb-lb in this guide).
- Scheme – internet-facing.
- In the Listeners section:
- Load Balancer Protocol – TCP (the only available option).
- Load Balancer Port – Port on which your AWS NLB listens for incoming connections. In this guide, and for most web applications, it is port 80.
- In the Availability Zones section, the zones that host the EC2 instances to which your AWS NLB routes traffic. Click the radio button in the leftmost column of the appropriate row:
- If you set up your instances with the instructions in Creating Amazon EC2 Instances to Run NGINX Open Source and NGINX Plus, select the default subnet within the default Amazon Virtual Private Cloud (VPC) to target a single availability zone.
- If you set up your instances using our scripts for Packer and Terraform, use the aws-nlb-subnet within the aws-nlb-vpc VPC to target a single availability zone.
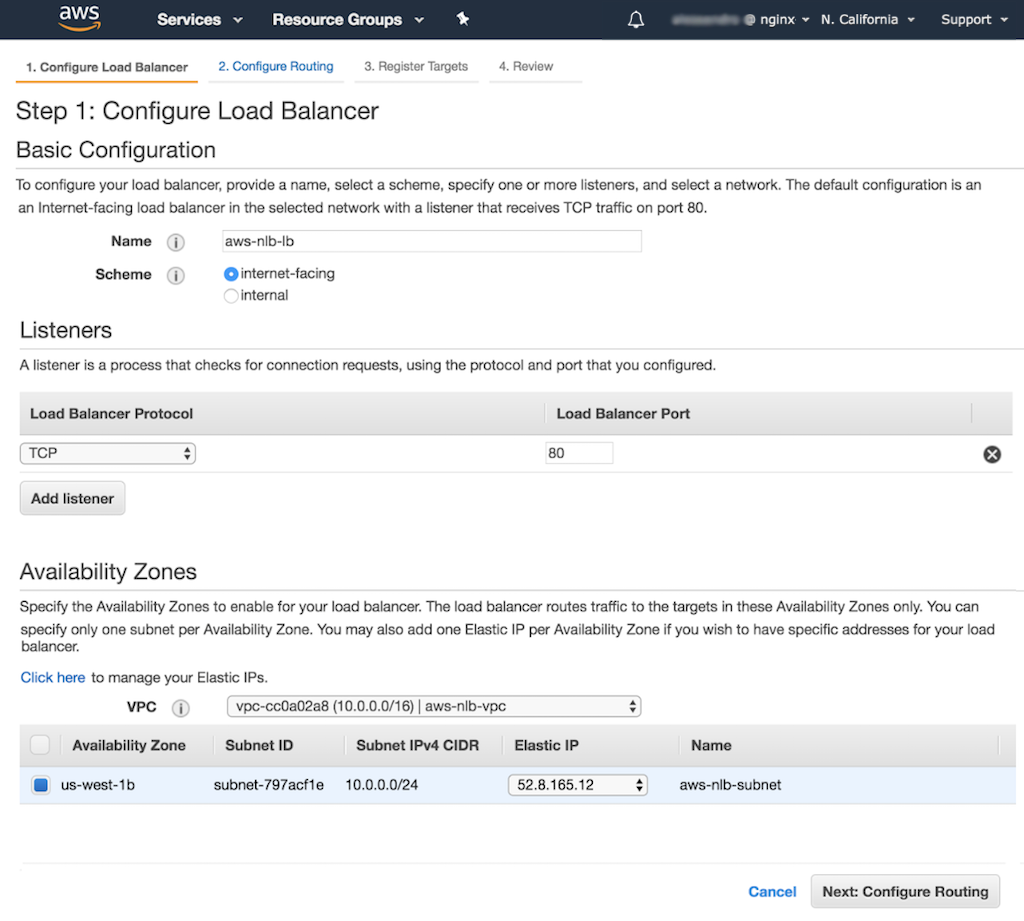
- In the Basic Configuration section:
When you select an availability zone in the table, a drop‑down menu appears in the Elastic IP column. Select the address you allocated in Allocating an Elastic IP Address.
Click the Next: Configure Routing button in the lower‑right corner of the window.
Configuring the AWS NLB Routing Options
In the Step 2: Configure Routing window that opens, you create a target group, which contains the set of EC2 instances across which your AWS NLB load balances traffic (you’ll specify those instances in the next section).
In the Target group section, select or enter the following values:
- Target group – New target group
- Name – Name of the target group (for this guide, aws-nlb-tg)
- Protocol – TCP (the only available option)
- Port – The port you specified for the Load Balancer Port field in Step 3 of the previous section (80 in this guide)
- Target type – instance
In the Health checks section, open the Advanced health check settings subsection and enter the following values:
- Protocol – Protocol the AWS NLB uses when sending health checks. This guide uses TCP, which means the AWS NLB makes a health check by attempting to open a TCP connection on the port specified in the next field.
- Port – Port on the target instances to which the AWS NLB sends health checks. In this guide, we’re selecting traffic port to send health checks to the same port as regular traffic.
- Healthy threshold – Number of consecutive health checks an unhealthy instance must pass to be considered healthy.
- Unhealthy threshold – Number of consecutive health checks a healthy instance must fail to be considered unhealthy.
- Timeout – Number of seconds the AWS NLB waits for a response to the health check before considering the instance unhealthy.
- Interval – Number of seconds between health checks.

If you want to use HTTP‑based health checks, select HTTP or HTTPS in the Protocol field instead of TCP. Two additional fields open (not shown in the screenshot):
- Path – The path to which the AWS NLB sends a
GETrequest as the health check. - Success codes – Range of HTTP response codes the AWS NLB accepts as indicating a successful health check.
Click the Next: Register Targets button in the lower‑right corner of the window.
Registering Instances in the Target Group
In the Step 3: Register Targets window that opens, you add instances to the empty target group you created in the previous section. For this guide, we add both of our NGINX Plus load balancer instances.
In the Instances table, click the radio button in the left‑most column for the two NGINX Plus load balancer instances, ngx-plus-1 and nginx-plus-2.

Click the Add to registered button above the table. The instances are added to the Registered targets table.
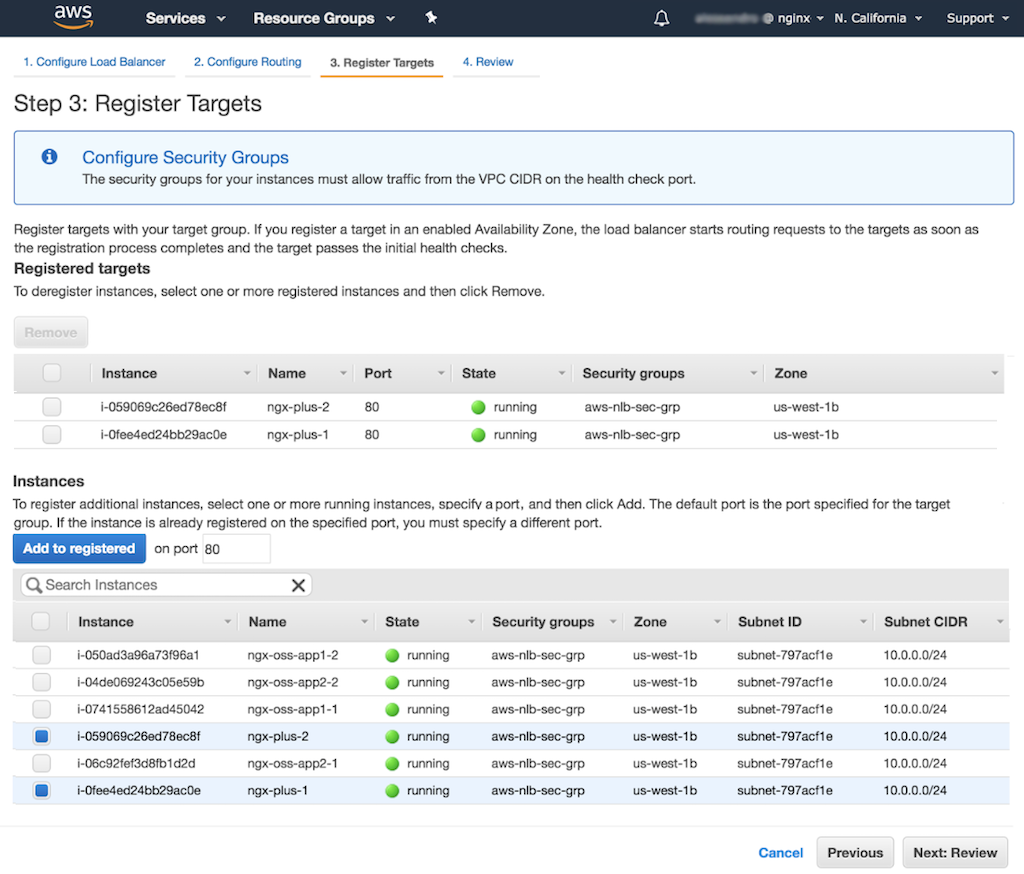
Click the Next: Review button in the lower‑right corner of the window.
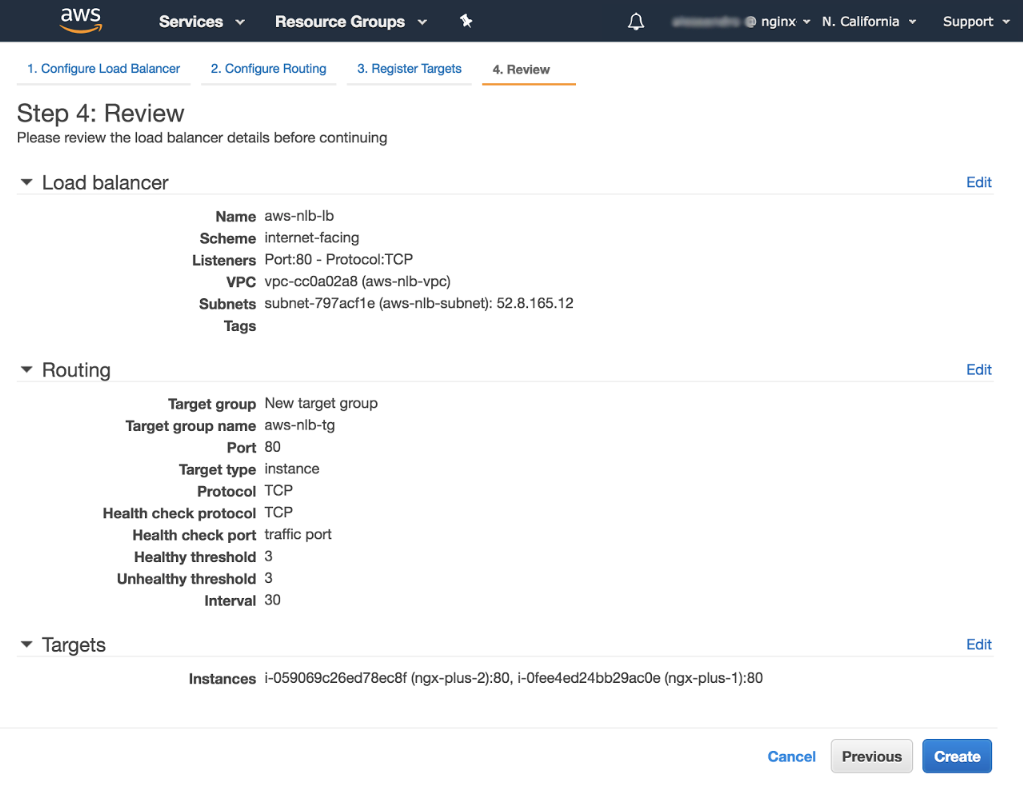
Launching the AWS NLB
In the Step 4: Review window that opens:
Verify that the settings are correct. If so, click the Create button in the lower‑right corner of the window. To change settings, click the Previous button to go back to previous screens.
The AWS NLB is provisioned. When the success message appears, click the Close button to return to the Load Balancers dashboard.
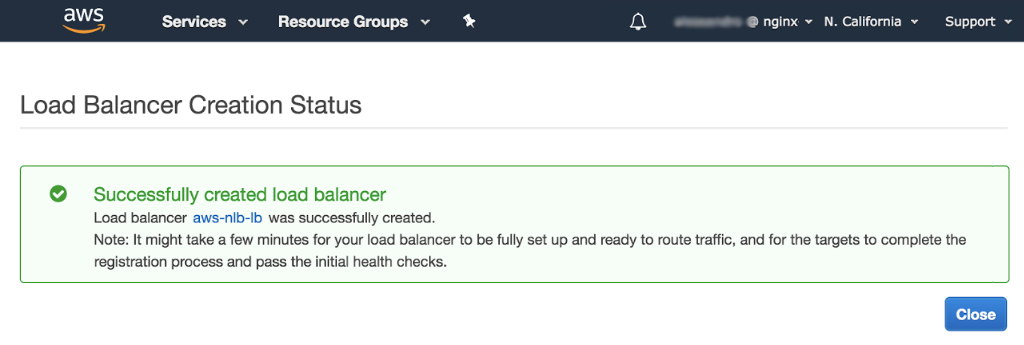
The Load Balancers dashboard opens. As noted in the previous Load Balancer Creation Status window, it can take a few minutes to provision the AWS NLB. When the value in the State column of the table changes to active, click the radio button in the left‑most column to display details about the AWS NLB.

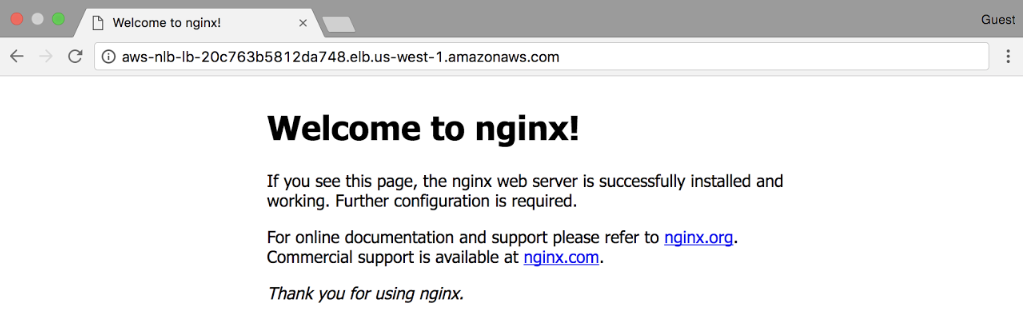
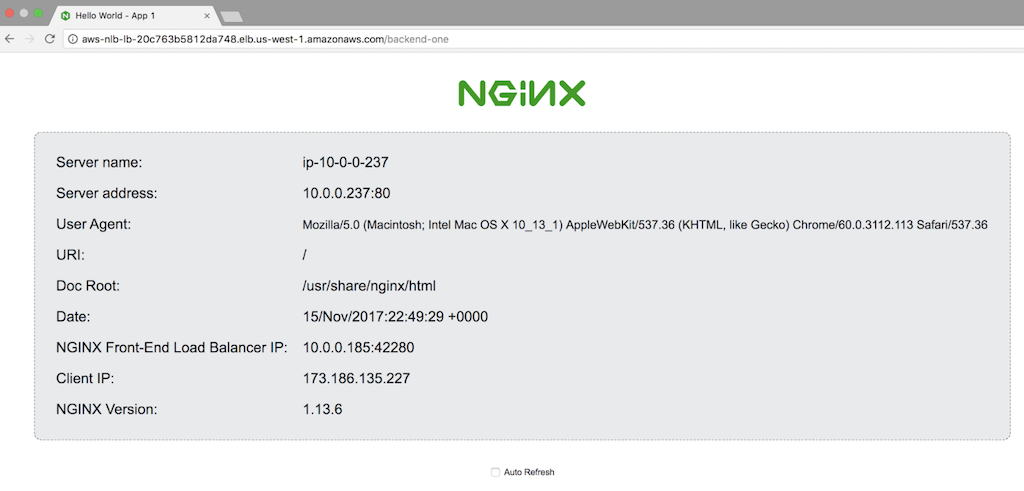
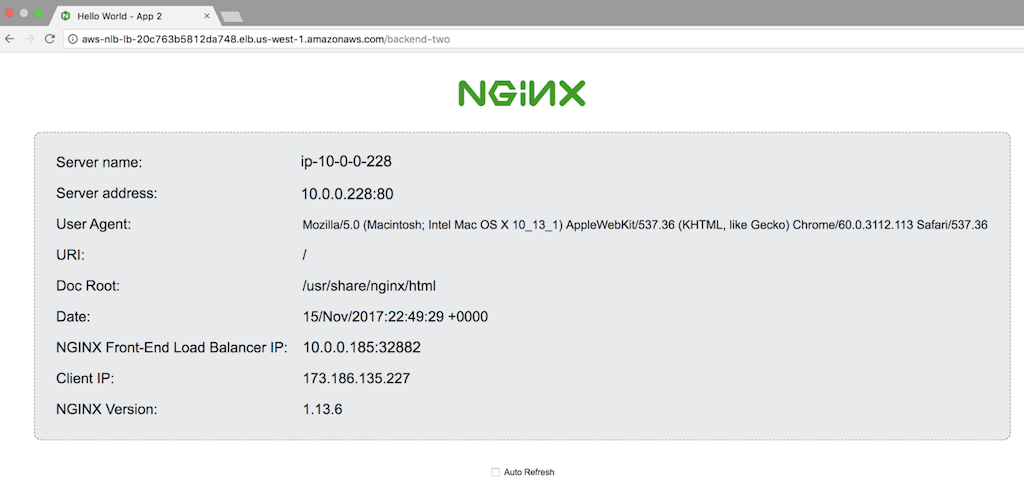
To verify that the AWS NLB is working correctly, open a new browser window and navigate to the AWS NLB’s public DNS name, which appears in the DNS name field in the Basic Configuration section of the dashboard. [If you copy and paste the DNS name, be sure not to include the parenthesized words at the end, (A Record).]
The default Welcome to nginx! page indicates that the AWS NLB has successfully forwarded a request to one of the two NGINX Plus instances.
To verify that the NGINX Plus load balancer is working correctly, add /backend-one and then /backend-two to the public DNS name. The pages indicate that you have reached NGINX instances serving the two backend applications, App 1 and App 2.
Appendix
The instructions in this Appendix explain how to create EC2 instances with the names used in this guide, and then install and configure NGINX Open Source and NGINX Plus on them:
- Creating EC2 Instances and Installing the NGINX Software
- Configuring NGINX Open Source on the Web Servers
- Configuring NGINX Plus on the Load Balancers
As an alternative to creating and configuring instances individually, you can use our Packer and Terraform scripts to completely automate the process:
Creating EC2 Instances and Installing the NGINX Software
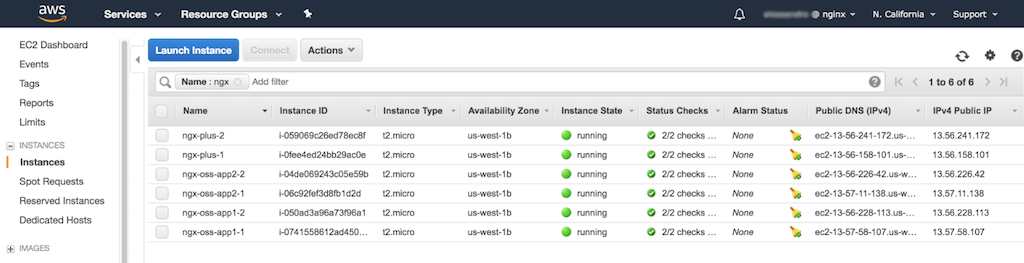
The deployment in this guide uses six EC2 instances: two instances running NGINX Plus that load balance traffic to four instances running NGINX Open Source as a web server. The four NGINX Open Source instances are deployed in two pairs, each pair running a different app.
Step‑by‑step instructions for creating EC2 instances and installing NGINX Open Source and NGINX Plus are provided in our deployment guide, Creating and Configuring Amazon EC2 Instances for NGINX Open Source and NGINX Plus.
Note: When installing NGINX Open Source or NGINX Plus, you connect to each instance over SSH. To save time, leave the SSH connection to each instance open after installing the software, for reuse when you configure it with the instructions in the sections below.
Assign the following names to the instances, and then install the indicated NGINX software. The screenshot below shows the resulting Instances table.
- Four web server instances running NGINX Open Source:
- App 1:
- ngx-oss-app1-1
- ngx-oss-app1-2
- App 2:
- ngx-oss-app2-1
- ngx-oss-app2-2
- App 1:
- Two load balancer instances running NGINX Plus:
- ngx-plus-1
- ngx-plus-2
Configuring NGINX Open Source on the Web Servers
The steps in this section configure each web server to return a page that specifies its name, address, and other information as defined in the demo-index.html configuration file that you create in Step 4 below. As an example, here’s the page returned by App 1:
Perform these steps on all four web servers: ngx-oss-app1-1, ngx-oss-app1-2, ngx-oss-app2-1, and ngx-oss-app2-2. In Step 4 replace the X with 1 or 2 as appropriate.
Note: Some commands require root privilege. If appropriate for your environment, prefix commands with the sudo command.
Connect over SSH to the instance (or return to the terminal you left open after installing NGINX Open Source) and change directory to /etc/nginx/conf.d:
$ cd /etc/nginx/conf.d
Rename default.conf to default.conf.bak so that NGINX Open Source does not load it:
$ mv default.conf default.conf.orig
Create a new default.conf file with the following contents. Each
sub_filterdirective corresponds to a field in the demo-index.html index file (which you create in the next step). In each case the appropriate NGINX variable is substituted for the hardcoded value in the field.server { listen 80 default_server; server_name app_server; root /usr/share/nginx/html; error_log /var/log/nginx/app-server-error.log notice; index demo-index.html index.html; expires -1; sub_filter_once off; sub_filter 'server_hostname' '$hostname'; sub_filter 'server_address' '$server_addr:$server_port'; sub_filter 'server_url' '$request_uri'; sub_filter 'remote_addr' '$remote_addr:$remote_port'; sub_filter 'server_date' '$time_local'; sub_filter 'client_browser' '$http_user_agent'; sub_filter 'request_id' '$request_id'; sub_filter 'nginx_version' '$nginx_version'; sub_filter 'document_root' '$document_root'; sub_filter 'proxied_for_ip' '$http_x_forwarded_for'; }
Directive documentation:
error_log,expires,index,listen,root,server,server_name,sub_filterIn /usr/share/nginx/html, create a new file called demo-index.html with the following text, which defines the page served by the web server. In the
<title>tag, replace theXwith1or2depending on whether you are deploying this code to an instance of App 1 or App 2.<!DOCTYPE html> <html> <head> <title>Hello World - App X <!-- Replace 'X' with '1' or '2' as appropriate --></title> <link href="data:image/png;base64,iVBORw0KGgoAAAANSUhEUgAAAEAAAABACAYAAACqaXHeAAAGPElEQVR42u1bDUyUdRj/iwpolMlcbZqtXFnNsuSCez/OIMg1V7SFONuaU8P1MWy1lcPUyhK1uVbKcXfvy6GikTGKCmpEyoejJipouUBcgsinhwUKKKJ8PD3vnzsxuLv35Q644+Ue9mwH3P3f5/d7n6/3/3+OEJ/4xCc+8YQYtQuJwB0kIp+JrzUTB7iJuweBf4baTlJ5oCqw11C/JHp+tnqBb1ngT4z8WgReTUGbWCBGq0qvKRFcHf4eT/ZFBKoLvMBGIbhiYkaQIjcAfLAK+D8z9YhjxMgsVUGc84+gyx9AYD0khXcMfLCmUBL68HMZ+PnHxyFw3Uwi8B8hgJYh7j4c7c8PV5CEbUTUzBoHcU78iIl/FYFXWmPaNeC3q4mz5YcqJPI1JGKql2Z3hkcjD5EUznmcu6qiNT+Y2CPEoH3Wm4A/QERWQFe9QQ0caeCDlSZJrht1HxG0D3sOuCEiCA1aj4ZY3Ipzl8LiVtn8hxi5zRgWM8YYPBODF/9zxOLcVRVs+YGtwFzxCs1Bo9y+avBiOTQeUzwI3F5+kOwxsXkkmWNHHrjUokqtqtSyysW5gUHV4mtmZEHSdRkl+aELvcFIRN397gPPXD4ZgbxJW1S5OJdA60MgUAyHu1KfAz+pfCUtwr+HuQc8ORQ1jK4ZgGsTvcY5uQP5oYkY2HfcK5sGLpS6l1xZQwNn7Xkedp3OgMrWC1DX0Qwnms/A1rK9cF9atNVo18DP/3o5fF99BGo7LFDRWgMJJQaYQv/PyOcHySP0TITrBIhYb+WSHLrlNGEx5NeXgj2paW8C5rs46h3Dc3kt3G2Ogr9aqoes+f5RvbL1aJ5iXnKnxkfIEoB3N/zHeHAmF9ovwryvYvC9TysnICkEonPX212vvOU8+As6eS+QCDAw0aNLABq6LO8DkJMSSznMMEfScFFGwCJYXbDV7lq17RYIQu+QTYpjRUBM3gZQIt+cOwyTpWRpYBQRsKrgU4ceNS4JkCSxLI1+ZsIS0NvXB6sLE/tL5EQkQJKOm52YON9y7glqJkCSOqzrD6Uvc1wZ1EBA07V/IafmN4ckHG+ugJkSEHuVQQ0ENFy9BLP3R0NR4ymHJGRWFWBnZ6fPVwMBF9EDgrD2z0USqtoaHJKw49SBoZ2dWggIxmcEsvspYLLi4PKNDrvv68OfuKLt/68MqiJAan4Q0IpDm6G7r8fue692X4fI7PiByqA6AqygNh0XHIaClDOkpz9aGVRJABo8CTP+3sqfHZJQeqkSgvHZn+xaqEICKAlhECSGO60MWdVF4IcesDL/ExUSYN3okCrD31fqHZLwcWkq5owPVUoA3UcIgdBv10BrV7vdz3b39kBhw0kVE2BNirG/bqRghyPqIcBKQkKJcVgE1LQ1wR3S5ooqCDBKlSEUzGdyFBNwvq1RTQT0b4BOF5+BgoayCUqAtTLMSXsRzl6uHX8EONoUtXS2KCfAusOsyVwFLV1tznNAuzflAGxb+R/esGuodDcD0bUVbYLelhRf/mWD08ogdYtTjNwYbIsrORhBIwJMPOTWHh1i6Lriz107FUKviivcZvfp8WZvN8TmbVS2rtsHI8mMtn9gSe50KAz79yWw8490OGYpp8lsTUGictd3EA6PHVwB20+mYUNURo/aMs4dhqjsdcoOWGxH5yYu0g0P0EzFBd7DxZoVHY7aHmWtB6VunwhLB6P0gFULk6zhJnvnBw5HW9D9N5GkpQEjMBcQOg+JMBNxjMZgHISawvGZHiKw+0mybv5ozP0txgvk07AQvWxAoh98sXsur3RmwMStxIud9fiIzMAIXTV6yNqxHaH7gg1GA7bgxVvHfEjq1hAl10ZM/A46gO0x0bOPoiHpSEDvsMZhXVVbVRL4TLz2E140EK1dgsnnd9mBaHcmwuigJHeCGLkXvHNaNHOBP4J/HYmoGbGwsJU1ka0nAvM2ht40758ZNmvvRRJ24l3roMa7MxVq4jpRdyMRc8bh9wR0TyIRWdR9hzNXaJs3Ftif6KDWuBcBH0hErky2bNraV5E9jcBjiapE1ExHkO8iEY1OvjLTjAkugezh7ySqFUPoXHTtZAR7ncY4rRrYYgtcCtGHPUgmjEhPmiKXjXc/l4g6HfGJT3ziEw/If86JzB/YMku9AAAAAElFTkSuQmCC" rel="icon" type="image/png" /> <style> body { margin: 0px; font: 20px 'RobotoRegular', Arial, sans-serif; font-weight: 100; height: 100%; color: #0f1419; } div.info { display: table; background: #e8eaec; padding: 20px 20px 20px 20px; border: 1px dashed black; border-radius: 10px; margin: 0px auto auto auto; } div.info p { display: table-row; margin: 5px auto auto auto; } div.info p span { display: table-cell; padding: 10px; } img { width: 176px; margin: 36px auto 36px auto; display:block; } div.smaller p span { color: #3D5266; } h1, h2 { font-weight: 100; } div.check { padding: 0px 0px 0px 0px; display: table; margin: 36px auto auto auto; font: 12px 'RobotoRegular', Arial, sans-serif; } #footer { position: fixed; bottom: 36px; width: 100%; } #center { width: 400px; margin: 0 auto; font: 12px Courier; } </style> <script> var ref; function checkRefresh() { if (document.cookie == "refresh=1") { document.getElementById("check").checked = true; ref = setTimeout(function(){location.reload();}, 1000); } else { } } function changeCookie() { if (document.getElementById("check").checked) { document.cookie = "refresh=1"; ref = setTimeout(function(){location.reload();}, 1000); } else { document.cookie = "refresh=0"; clearTimeout(ref); } } </script> </head> <body onload="checkRefresh();"> <img alt="NGINX Logo" src="data:image/png;base64,iVBORw0KGgoAAAANSUhEUgAAAWAAAABICAMAAAD/N9+RAAAAVFBMVEUAAAAAmQAAmQAAmQAAmQAAmQAAmQAAmQAAmQAAmQAAmQAAmQAAmQAAmQAAmQAAmQAAmQAAmQAAmQAAmQAAmQAAmQAAmQAAmQAAmQAAmQAAmQAAmQDBect+AAAAG3RSTlMAB0AY8SD5SM82v1npsJ/YjSl0EVLftqllgMdZgsoQAAAHd0lEQVR42szZ6XabMBCG4ZGFxSazLzZz//fZc9I4JpbEN8LQ0/dnGwJ5DJGG0HdpM9kkuzVXiqussmRpLrRdnwqDp9ePyY7zXdFbqptHOz00RTVUxWiyquvJ26Upknp2/heWN0Uyzt3qYtKMn805ybsW/LdK01YVC6sVELH81XJ9o6j5q6Qkcepe83dJp8ipf161HSgm1TyPK5//cuN1d5KmE342bsnkLK6hre78LNG0KuWfOrFDwats69w8ln+qFIlrx9Vxf8808e8eJGx9YEXhCpZ3kX2gfFtbrX4m05IonTE7wsGLnpXY1/Kqr3v/5r+NcAOvy8HXCRt74W+alH568KqCJKmM37LafVhe3ZTU1/mmA7uV9Ar8vPjZVCPDZI+CDdwFC68yIooZnbhmIAx8XyoZu5mcYO9HzhSo47gGCqR53ULPlAGPkuyazJVeKWYsjH15Djy/VhPO8LoM/OJE4XNfeJ19LUfRj18KF9gLA2GZL4/UsLdFHQVccWyTCDjZD9wm7Kt2PgIgjH3ZBlf46iDgnOO7nwusavZmVoCaPU0q1pcnshyoOwa44PiS66nANw7U0isbK5x7j3gQB0uPAB54T8WZwA/RHrxhLIx9TbsBnLSfA6uRd9WdBzywCFiNUcJ5wr4eRByu7j8G7nhfpj0LuE0A8OtsSBj7ZooIL+dyYLxFm27+EvfSzgHua/GYXrK3Qol9a03bwNxEAeMt2ix/bptzgCeGwFhY7ouAufwIOA/PSni3nJ8B3DAElgtjXwxs8k+Al/BdiVfDWh0PPDAAjhXGvgTnVjkwujzbk1t4TWkOB24TBBwrjH2JQZnaC6xGsPdCT296MHA/MgKWC2NfL7Blp2ov8AM88/gNbX8osCrc5xMAA2Ho6wIXHTt1+4C1iZwMW8NvzYcCN67vAICBMPZ1galip3QXcAXHXzyVlB8AYyiT5wAYCWNfF1gtYGYWAufhNynyTWqiDwPOjeelnQiYShMQBr5+YNIWzMwy4CX69afv1NNRwHr07FKEwDT4hTPs6wL7P+tCxQKXm/eifJ963wmMF7hCYWBXGJdpAsBUopkZAyv3j3+i9PUtTa/U9VcAGC1wmgAwFsa+LnBooLxj4K0t2qjo8AAwWuAIAO8TznoSANMEZmYErA14p3EyMF7gSgLAQBj4ImBVg5kZAM/8u4VAJwJ7l+2GADAQBr4A2D+1Z0oMnKM3Y2cD4wUOAANh5IuB6cJOsxg4Q0eeCwwXuFETBnZLDfSVA1NwZsbAJXwN/C+B7771BAAjYeyLgX0z8yACVlawx1NaXh+5TcMLHACGwtgXA6OZ2QUObdGsorfabjIsr4wcNOACB4CBMPLFwOHpcuwx8NWgLXTJURW0H1gtngUOA8cLLz1FAsOZWQ4MfFH5B8CV7x75b4D/NHduS47CMBCVwYFAiDEmCQT+/z/3ZWumah1otZdL/MxMZc5gybJanU8tLI9DhF8PESXJ10k64PAxyn1LiPisMhr/N8kNHF+bpwPOis95+juS3IJOrsgQYBlXj2mWFVHRgHGC+4pj2kKjbG4ufKGRLmdtTTJgc12WKn1BofE7zBTXzAhwtlIqP9h5gmTAbq1xcHqpvBbHBgRY7suXPTl/ROMB4wR36mUPKjXnNwLcrVxXXimRZTLgDBSiZ15XYj3XAwAWv3zh7gnAXtIAx6Etnq888cIdX/fZDgDul1tGvf4Vtn0S4M8J7i7ROq1lhCVHzzwGvBpYbJ5AOEgq4EEzZn5K01MrmqvNOmDTLrft+8FSRzQecFBpO05p26tlnw7oIso14YnJ3i5aL6DF0wMuleqkM4Qn+smcAKRTL1Y65UDQVAO+WK2+7gTplH54usjWAXek+K+LCuxEwGMLul0R4EPFfz8L18zzKmDxIKSCN95LIuBGr3GujpevErqxGQDuLaPuyUAfBAPGg6Mx4OME2DhQVgUJWAIzQnBFfRAeMI5N1XEjBBiwjCxg0+qHYG7wt/GA8capDh+CqYkpCoykjPKWesio2gywEwD4qDEuDNjUJGCptQqUAB5MB3w1APBhg4gYsPQtCbib00Zpi3wrwM1FAOBjR2lrZBXCARY3J623bAS4yAQAPnIYHAOWkgSc2xS+T7MV4CAA8LF2BhiwBAwYP4+lPBsBdgIAH2XIgQHjTf+SrRw5auEAG5Dg9ID3t5TBgM3EWR88eMAVCVieYM5aDXgHUyQAmKiZR9nIFckJC/gFnALUgHew9QKAiZq5A3+EXspDAw7gP64GvIcxXQvfHl2B7tiozSf+y1JSNQ31gRYDQb6HteKQ4B3s4QucflRrDW8OKiHBujCO3s0u5qAjwKR0vnkDozL1emgd5W6EWa1ud7l97G0n3jhYzACOEMlHtVpjeBA/mLf/7IOoQsa7y+b7GDR3Rbw98fKQLy+5xv7VIXowIhy1ztUfbdzLYrz7cbrvRb/K+nf7wPPQpAXsEQ/7l2AXW97/AGkCwaNsIif8zU3y5eZaO/mK/jKDV1s872/Fz11K5TLE1zzEiP1km8ndDMcj3JvmFfqdvubhD8TgHPiN+LViAAAAAElFTkSuQmCC"/> <div class="info"> <p><span>Server name:</span> <span>server_hostname</span></p> <p><span>Server address:</span> <span>server_address</span></p> <p class="smaller"><span>User Agent:</span> <span>client_browser</span></p> <p class="smaller"><span>URI:</span> <span>server_url</span></p> <p class="smaller"><span>Doc Root:</span> <span>document_root</span></p> <p class="smaller"><span>Date:</span> <span>server_date</span></p> <p class="smaller"><span>NGINX Frontend Load Balancer IP:</span> <span>remote_addr</span></p> <p class="smaller"><span>Client IP:</span> <span>proxied_for_ip</span></p> <p class="smaller"><span>NGINX Version:</span> <span>nginx_version</span></p> </div> <div class="check"> <input type="checkbox" id="check" onchange="changeCookie()"> Auto Refresh</input> </div> <div id="footer"> <div id="center" align="center"> Request ID: request_id<br/> © NGINX, Inc. 2018 </div> </div> </body> </html>
Configuring NGINX Plus on the Load Balancers
Perform these steps on both ngx-plus-1 and ngx-plus-2.
Note: Some commands require root privilege. If appropriate for your environment, prefix commands with the sudo command.
Connect over SSH to the instance (or return to the terminal you left open after installing NGINX Plus) and change directory to /etc/nginx/conf.d:
$ cd /etc/nginx/conf.d
Rename default.conf to default.conf.bak so that NGINX Plus does not load it:
$ sudo mv default.conf default.conf.orig
Create a new default.conf file with the following NGINX contents:
upstream app1 {
    server <internal IP address of ngx-oss-app1-1>;
    server <internal IP address of ngx-oss-app1-2>;
    zone app1 64k;
}

upstream app2 {
    server <internal IP address of ngx-oss-app2-1>;
    server <internal IP address of ngx-oss-app2-2>;
    zone app2 64k;
}

server {
    listen 80;
    status_zone backend;
    root /usr/share/nginx/html;

    location / {
        # directives for serving the site's HTML landing page
    }


    location /backend-one {
        proxy_set_header Host $host;
        proxy_set_header X-Forwarded-For $remote_addr;
        proxy_pass http://app1/;
    }

    location /backend-two {
        proxy_set_header Host $host;
        proxy_set_header X-Forwarded-For $remote_addr;
        proxy_pass http://app2/;
    }

    location /api {
        api write=on;
        # directives controlling access, such as 'allow' and 'deny'
    }

    location = /dashboard.html {
        root /usr/share/nginx/html;
    }

    # Redirect requests made to the pre-R14 dashboard
    location = /status.html {
        return 301 /dashboard.html;
    }
}
Directive documentation:
api,listen,location,proxy_pass,proxy_set_header,return,root,server(upstream),server(virtual),server_name,status_zone,upstream,zone
You have completed the prerequisites and can continue with Configuring an AWS Network Load Balancer.
Automating Instance Setup with Packer and Terraform
As an alternative to individual creation and configuration of the six instances used in this guide, you can use the Packer and Terraform scripts from our GitHub repository. They generate the complete setup for this guide, with two load balancer instances running NGINX Plus and four web server instances running NGINX Open Source.
After executing the scripts, you can jump directly into the instructions for creating an AWS NLB without any further setup. Additionally, the scripts create a new set of networking rules and security group settings to avoid conflicts with any pre‑existing network settings.
Note: Instead of using the default VPC like the instructions in our Deployment Guide, the scripts create a new VPC.
To run the scripts, follow these instructions:
Clone or download the scripts from our GitHub repository:
- The scripts in packer/ngx-oss are for creating an Ubuntu AMI running open source NGINX.
- The scripts in packer/ngx-plus are for creating an AWS Linux AMI running NGINX Plus.
- The scripts in terraform are for launching and configuring the two NGINX Plus load balancer instances and the four NGINX Open Source web server instances.
Set your AWS credentials in the Packer and Terraform scripts:
For Packer, set your credentials in the
variablesblock in both packer/ngx-oss/packer.json and packer/ngx-plus/packer.json:"variables": { "home": "{{env `HOME`}}", "aws_access_key": "", "aws_secret_key": "" }For Terraform, set your credentials in terraform/provider.tf:
provider "aws" {
  region = "us-west-1"
  access_key = ""
  secret_key = ""
}
Copy your NGINX Plus certificate and key to ~/.ssh/certs.
Run the
setup.shscript:$ chmod +x setup.sh $ ./setup.sh
The script launches two NGINX Plus load balancer instances and four NGINX web server instances and configures the appropriate settings on each instance to run the guide.
If you want to delete the infrastructure created by Terraform, run the cleanup.sh script.
$ chmod +x cleanup.sh
$ ./cleanup.sh